Sensor Notifications
You can create notifications based on SysTrack sensors. These sensor notifications automatically notify designated recipients whenever problems arise.
A sensor is triggered when a monitored data metric surpasses the threshold values configured for the sensor. When sensors are triggered on the number or percentage of devices specified in a notification, SysTrack sends an email alert. Use the Notifications page in Configure to set up and manage sensor notifications.
Create a Sensor Notification
-
In Sensor Configuration select Notifications.
NOTE: If there are no existing notifications, you will see a Create Sensor Notification button.
-
Click the
 button in the upper left, or the Create Sensor Notification button if there are no existing sensor notifications. The Create Notification page opens.
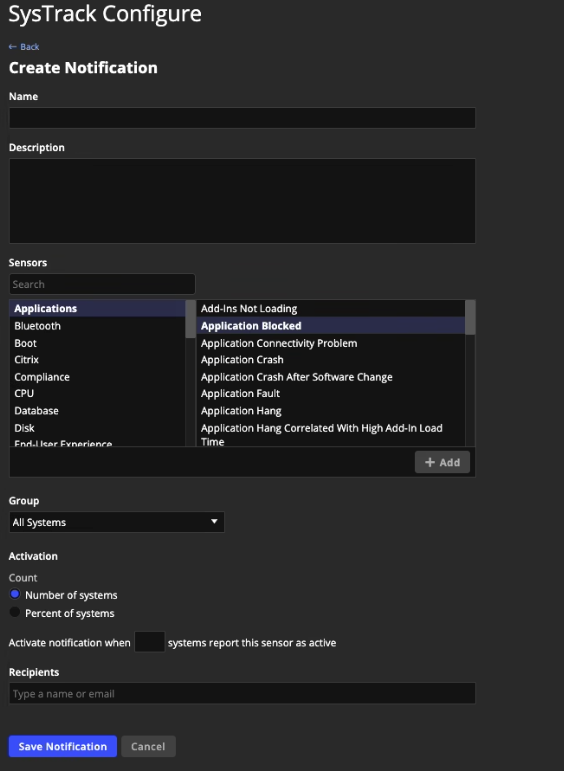
-
Enter a notification name.
-
Enter a description.
-
In the Sensors section, use the list of sensor categories on the left to select the sensor type, then choose a sensor from the list on the right. You can also use the Search field to find a sensor or category.
-
Click Add to add the selected sensor to this notification.
NOTE: You can add multiple sensors to a single notification. For a system to count toward the Activation threshold, all selected sensors must be triggered at the same time on that system.
-
If the selected sensor supports sensor instancing, an Instance drop down list displays. For these sensors, you can specify an instance for the notification. For example, if you select the Application Hang sensor, you can choose to receive notifications only when msedge.exe hangs.
By default, the Instance drop down list is set to All Instances. This means any activation of the sensor counts toward the activation threshold, regardless of instance.
NOTE: The Instance options are generated based on recent data from the selected sensor. This drop down list includes instances from every time the sensor triggered in the past 30 days
For example, the drop down for the Application Hang sensor lists executables that recently experienced a hang on monitored systems. If msedge.exe has not experienced a hang on any system in the past 30 days, then you cannot create a new sensor notification for msedge.exe hangs. Existing sensor notifications can still be edited and duplicated, even if the specified instance has not occurred in the past 30 days.
-
Use Group to select a group of systems for this notification. Only systems in the selected group count toward the activation threshold. By default, all systems count toward the threshold.
-
In Activation > Count, select whether the notification should activate based on the number or percentage of systems on which the selected sensors are triggered. Enter the desired number or percentage in Activate notification when....
-
In Recipients, you can add the name and email address of someone who should be alerted when this notification activates.
-
This field supports type-ahead search based on name or email address. Start typing the information for a recipient and if the recipient is in the recipients list, they display in the results.
-
If the search yields no results, add a new recipient. Click + Add. Add additional names and email addresses as needed. You can also add and remove recipients using the Recipients tab on the main Notifications page.
NOTE: Notifications can have zero recipients because they are an optional part of sensor notifications.
-
The Recipients field contains all of the SysTrack users for a tenant. If you search and there are no user matches, the Add New Recipient dialog box opens where you can add a user type. See Sensor Notification Recipients for more information.
-
-
Click Save Notification to enable the notification.
-
Click the lock icon when you are done.
View Sensor Notifications
In the Notifications tab, existing sensor notifications are presented in a table. By default, only enabled sensor notifications are shown.
Use View to see Enabled, Disabled or All notifications. Manually disable notifications to prevent them from activating and sending emails.
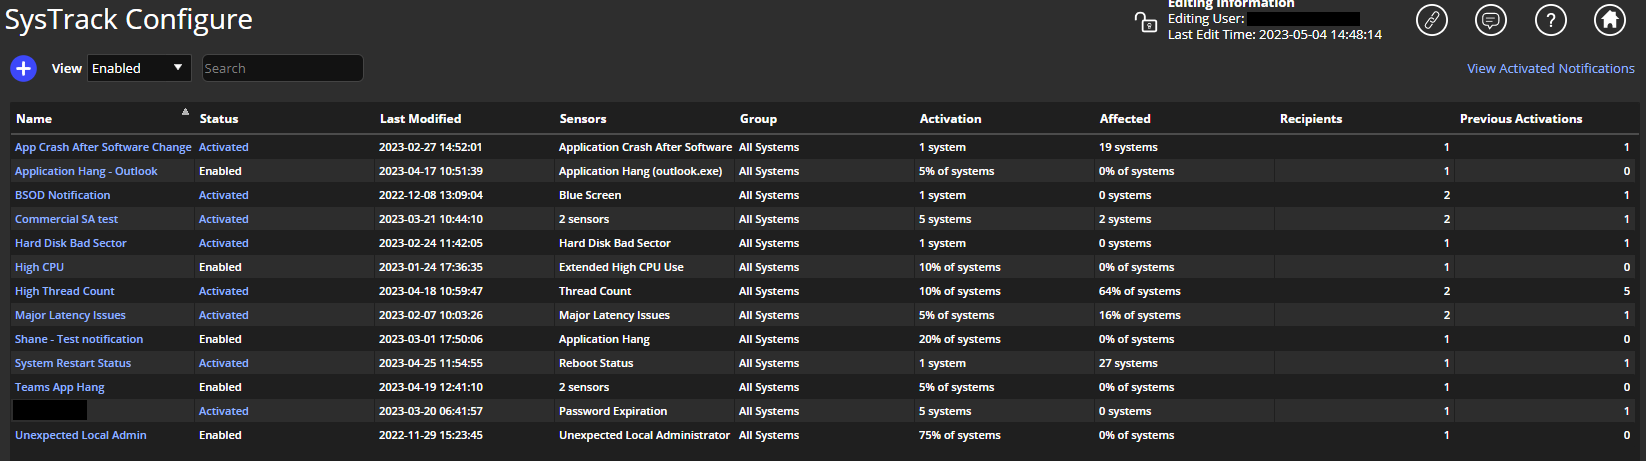
NOTE: The View Activated Notifications link in the upper right corner goes to the Notifications page in Prevent. Use this page to monitor and manage the status of your sensor notifications. This link only displays if you have access to Prevent. See for more information.
View Sensor Details
You can click an existing sensor notification on the main Notifications page to view its details, including activation history. If Configure is unlocked, the selected notification can be enabled, disabled, duplicated, edited, or deleted.
View History and Activations
The History graph shows the number of systems on which all sensors for the selected notification have been triggered. Contrasting colors show when the notification has been activated.
Status changes of a sensor notification are shown by a vertical line with a symbol at the top: a red exclamation point  indicates an Activated notification, a gray X
  indicates a Dismissed notification, and a green check mark
  indicates a Resolved notification. Hover over a symbol to display the date, time, and either the number of affected systems at activation or the name of the user who dismissed or resolved the activation.
Use the drop-down list to view data for the Last 30 Days (default) or the Last 7 Days. Use the menu in the upper right to view the chart full screen, print it, or download it in a variety of formats.
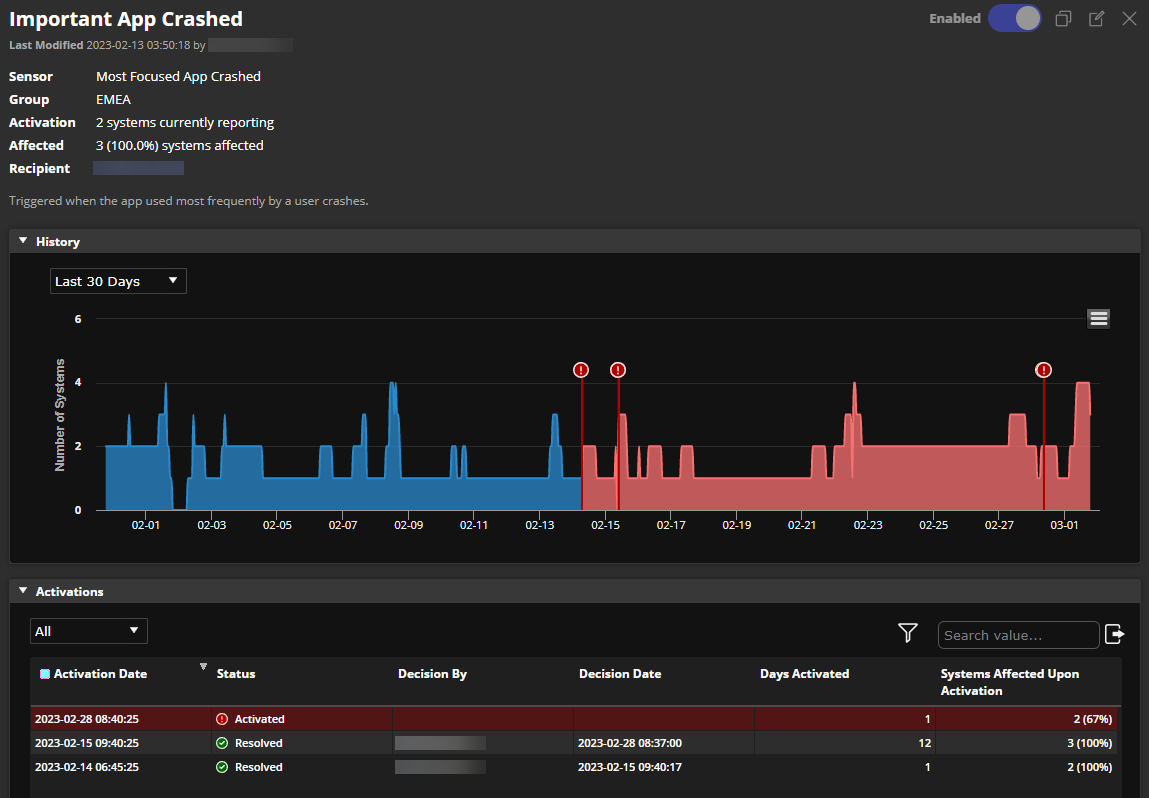
The Activations table lists the activations for the selected sensor notification, with Activation Date, Status, Decision By, Decision Date, Days Activated, and Systems Affected Upon Activation listed for each activation. Use the drop-down list to view activations based on their status. You can click the button in the upper right to export the table.
To drill down into activation details, double-click an entry in the Activation Date column. The activation instance is shown in Prevent with more details about the affected systems and the history of the activation. See the Prevent User Guide for more information.
For each activation of the sensor notification, the Status is Activated, Dismissed, or Resolved. After a notification is Activated, a user can change the status to Resolved or Dismissed in Prevent. A Resolved status means the conditions that triggered the activation have been resolved. Users can mark an activation as Dismissed for various reasons - generally, this should indicate an irrelevant activation. If a user edits an Activated notification in Configure, it automatically gains the Dismissed status until it meets the activation threshold.
If a user has changed the status to Resolved or Dismissed (either via Prevent or by editing a notification in Configure), then their name appears in the Decision By column. The date and time of this action is listed in the Decision Date column.
The Days Activated column shows how long each activation lasted. The Systems Affected Upon Activation column shows the number of systems affected by the designated sensors when the notification activated.
Enable or Disable a Sensor Notification
To change the enabled status of a selected sensor notification:
-
Click the lock icon at the top of the page.
-
If the status of the notification is
 , you can enable it by clicking the toggle.
 -
If the status of the notification is
 , you can disable it by clicking the toggle. If the notification is currently Activated, it will be automatically Dismissed.
 -
Click the lock icon when you are done.
Duplicate a Sensor Notification
You can make a copy of the selected sensor notification, then edit and save it as a new notification. To duplicate a notification:
-
Click the lock at on the top of the page.
-
Click the duplicate button
 . The Create Notification page opens with details copied from the selected notification.
 -
Edit the duplicate as needed, then click Save Notification.
Note: Notification names must be unique.
-
Click the lock icon when you are done.
Edit a Sensor Notification
To make changes to the selected sensor notification:
-
Click the lock icon at the top of the page.
-
Click the edit button
 . The Edit Notification page opens with the selected notification loaded.
 -
Edit the notification as needed, then click Save Notification. If the notification is currently Activated, it will be automatically Dismissed until it meets the activation threshold.
-
Click the lock icon when you are done.
Delete a Sensor Notification
-
Click the lock icon at the top of the page.
-
Click the delete button
 . A Delete Notification dialog opens.
 -
Click Delete to finish deleting the notification, or Cancel to keep it.
-
Click the lock icon when you are done.
On This Page